Tag Archive for: organizing process

Fashion File

skincareOne of the reasons we hold onto paper is because we need or want to reference the information (on the paper) in the future.  However, what happens when we can’t put our hands on a piece of paper quickly and easily?  We waste time hunting and searching for that paper, or we attempt to find the information from another source.  Is there really any need to save paper that we can’t find quickly and easily?  No!  So, what will help us find specific papers when we need them?

An organized paper storage system will help us locate what we want, when we need it, and help us remember where paper is stored.   Creating an organized system can be quite an undertaking.  The initial step in this undertaking is to have a paper storage container (ie. file cabinet) that holds alphabetical files that are labeled with file names.  It is essential to customize the file names to reflect our specific, personal retention needs. The best way to do this is to create file names that uniquely describe what information is stored inside the file.  This is much more efficient than using generic or standardized names.  For example I use the file name “Kia Soul” instead of Auto, Car, or Vehicle.

Another example of a customized file that I have is my “Fashion File”.  It holds all the girly things that I want to reference, look into, check out, or use.  It contains 5 separate categories, hair, jewelry, nails, skincare, and wardrobe.  The types of papers that I store in each category are as follows:

Hair – contact information for my current stylist, pictures of hair styles that I like, products I want to try
Jewelry – receipts of jewelry purchases, business cards for jewelry consultants, jewelry catalogs
Nail – business cards for local nail salons with times and directions
Skincare – business cards for skincare consultants, products I want to try, lists of chemical free products, skincare catalogs
Wardrobe – contact information for image consultants, tips for my body type, fashion styles I like

By establishing and using this unique file name, and other personalized file names, I have created an organized system that helps me remember where my papers belong and where I can find them when I need them.  This approach could work for you.  If you do use it please share with me what file names you use.

© June 2015  Janine Cavanaugh, Certified Professional Organizer®  All Rights Reserved

NAPO

Proud member of NAPO

6 Lists Everyone Should Use

Check listAre you a list maker?  I am.  I make lists for a large variety of things, because they help me stay organized.  Besides being a great way to document the information that collects in my head, lists are helpful in prioritizing information and providing visual queues for what needs to be done.  Below are 6 of my most used lists.

1.  To Do List
Creating a master To Do List that contains all the things I want to get done, need to accomplish, and have to address, provides me with peace of mind.  By writing all these things down, I release myself from worrying that I will forget something.  By having the list to check and work from, it’s easier to organize and prioritize what I do, and when I do it.

2.  Daily Tasks List
Working from my master To Do List, I write 3-5 Daily Task items on each day of my calendar.  It’s important to prioritize my Daily Tasks and to make sure I have enough time during that particular day to get the item done.  If I don’t complete a Daily Task item, I indicate it with a colored tab, but only if I think I can get to it within the week.  If not, I cross it out and write it on another day in the future. It’s very rewarding to check off the items, and see what was accomplished in the day and the week.

3.  Shopping List
A magnetic note pad and pencil on my fridge are what I use to create my shopping list. My husband and I write down what we need to pick up at the grocery store whenever we think of an item, or whenever we run out of something while preparing meals. The placement of this list needs to be easy and convenient in order to encourage everyone in the household to write items on the list. A basket on top the fridge holds all of our coupons, discount cards, and any gift cards marking the fridge as our shopping ‘center’.

4.  To Bring on Vacation List
Creating a list of what I want and need to bring on vacation provides me with time to organize my thoughts an plan ahead. This prevents me from forgetting important and necessary items. Creating one location where I can collect the items on my list, until it’s time to pack them in suitcases, is also a helpful component to this vacation list. I use my dinning room table as my collect location.

5.  List of Important Dates
Having a master list of important dates, that I transfer into a new calendar at the beginning of each year helps me stay on top of important dates and time lines. I keep a birthday and anniversary list by month, a taxes and bill payment schedule by month, and a membership and license renewal list by month.  For large bills and membership renewals, I note on my calendar two weeks in advance to payment and one week in advance to payment.  Referencing these lists when setting up my yearly calendar is very helpful.

6.  Honey Do List
My Honey Do List is a list of items that my husband needs to address or that we need to discuss. This list is kept by the kitchen phone (or is waved in front of his face while he’s watching TV). Any action items that need to be planned for a specific date are put on the calendar.

©February 2015 Janine Cavanaugh,CPO® All rights reserved.

NAPO

Proud member of NAPO


Time to Organize

Schedule time on your calendar to organize.  Treat it like an appointment that you can’t reschedule without a large rescheduling fee.  Then pick just one target area to work on, and tackle one flat surface in that area.  For example, if you’re working in the kitchen, start with items on the counter.  If you’re working in your closet, start with items on the floor.  If you’re working in your home-office, start with items on the desk.

Organizing Decorations

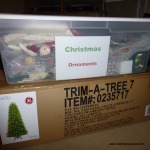
Tree Orn. binIf you’re like me, you like decorating for the holidays.  It gets me in the holiday spirit, and I enjoy adding sparkle and cheer to my home.  However, taking those decorations down, packing them up, and storing them until next year is an entirely different story.  That part of the process always seems like such an unwelcoming chore.  So, I’ve done my best to simplify the process and make it as painless as possible.

The first suggestion is to have a designated location in your basement, attic, garage, or other storage area, for the holiday decorations to live undisturbed until next year.  This prevents them from just being shoved anywhere, everywhere, or wherever they’ll fit.  My designated location is on plastic storage shelves in my basement.Tree Orn. sign

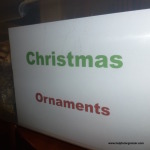
The second suggestion is to use clear bins and large easy to read labels.  This allows you to easily spot what is stored inside and where it belongs.  I print large color coded labels, and tape them to the inside of the clear bin.  This allows me to easily read the label because of the large size, and to easily recognize the holiday because of the label color.  It also prevents the label from falling off, fading, curling, or becoming illegible.  I place two labels in the bin on opposite sides, so that no matter how the bin is placed on the shelf, I can view the label.

tree ornaments in binThe third suggestion is to store holiday decorations in layers with bubble wrap in between each layer.  This is much faster than wrapping each individual decoration.  It works best if you put decorations that are similar in width in the same layer.  Also, place plush and soft decorations in between wooden and breakable decorations, and only store fragile or collectible decorations in their original boxes.

The fourth suggestion is to store holiday decorations based on where they are placed inside or outside the house.  For example I have bins of Christmas decorations for each room in my house.  This way I can easily decorate one room at a time, and pack up one room at a time.  It helps me streamline the processes.

The fifth suggestion is to keep all decoration accessories in the perspective holiday bins.  I keep the extension cord, the light timer, extra light bulbs, tree ornament hooks, and the tree skirt in the same bin as the tree ornaments.  This way I’m not searching for these items when it’s time to decorate each year.

I understand that putting away holiday decorations can be a drag, but I hope these suggestions will help prevent procrastination.

©January 2015  Janine Cavanaugh, Certified Professional Organizer®  All Rights Reserved
NAPO

Proud member of NAPO

Organizing Medical Papers

finished fileIn preparation for visiting a new doctor last week, I realized that my medical papers were not organized in a manner that was suitable to my needs. They were mostly organized in chronological order of doctor visits, and I wanted them organized by subject, and then, in chronological order of doctor visits. So, I gave myself the project of organizing my medical papers.

tools neededThe tools I used were a hanging file, a file folder, 8 sheets of paper, 8 tabs, a highlighter, and a black marker.  I first sorted all my medical papers into subject categories. I choose 8 different categories that made sense to me as I was sorting my papers. The 8 subject categories I used were general information, yearly physicals, mammograms, doctor visits, eyes, and 3 categories for specific ailments I have. Your medical categories may be slightly or completely different. That is understandable.  Personalization is encouraged.

Here is a list of the types of papers I have in each subject category:
General information – primary care doctor contact information, office hours and locations, medical insurance documents
Yearly physicals – medical history records, physical exam results, lab results, appointment reminders
Mammograms – test results, appointment reminders, literature on subject
Doctor visits – test results, appointment receipts, insurance explanation of benefits
Eyes – appointment receipts, exam results, prescriptions, eye glass receipts
Specific ailments – test results, appointment receipts, diagnoses, prescriptions, literature on subject
file names

I used the highlighter to mark the date and subject on specific papers. I used the tabs and paper to create dividers for each of my 8 subjects. I used the marker to write the subjects on the tabs. I placed all the tabs on the upper left hand side of the paper (horizontal) so they would fit into the file folder and be easier to read.  It’s much easier to scan one area for the subject tab, then have to scan staggered tabs, especially since we read from left to right. I reduced as many papers as I could before reassembling my medical file.  I shreded 56 papers that I felt comfortable discarding.

The project took me about an hour to complete. Since all of my papers were in one file folder and in a semi organized state, I was able to complete the project in a relativity short amount of time, but if you’re going to organize your medial papers and they’re in disarray you will need to give yourself more time to complete your project.  You will also realize as you sort your medical papers that your subject categories will be specific to you.  That is ideal.  Each and everyone of us needs to find a way of organizing that is personally suitable to our individual needs.


© December 2014  Janine Cavanaugh, Certified Professional Organizer  All rights reserved

NAPO

Proud member of NAPO