
Shop Less
 Shop less and buy less. When we have less coming in we have less decisions to make, less to organize, act upon, and maintain. One thing that has helped me buy less is to think before I buy and ask myself gatekeeper questions.
Shop less and buy less. When we have less coming in we have less decisions to make, less to organize, act upon, and maintain. One thing that has helped me buy less is to think before I buy and ask myself gatekeeper questions.

 Do you love to shop, hunt for bargains, and practice retail therapy? If so, you are not alone. For many, shopping is their favorite pastime. It’s easy to get caught up in a buying frenzy with friends. It’s thrilling to find great deals, and see how much we’ve saved. It’s fun to purchase gifts, and surprise loved ones. It’s so convenient to shop online and have things delivered right to our door. But how often do we stop and think before buying something? Do we really need a life-time-supply of dog chews? How much extra are we spending each year to get the “free shipping”? Is it worth getting two free if we can’t even use up one before it goes bad? How much of what we buy is extra, surplus, or wasted?
I’ve found a successful way to help me stop and think before I buy. I’ve compiled a list of gatekeeper questions that allow me to pause and ask myself, “Why buy this?”. These questions are called gatekeeper questions because we control the gates to our properties. We all have the power to prevent a purchase from entering our homes. When shopping ask these questions (to the item) before committing to buy.
 Why are we buying you? Need? Want? Impulse? Obligation? Fundraiser?
This gatekeeper system requires some practice and discipline, but it helps me feel more prepared to make a mindful purchasing decision. Hopefully you will find it helpful as well. Try it and let me know what you think?
©June 2018 Janine Cavanaugh, Certified Professional Organizer® All Rights Reserved

Experiment with minimalism. Have you ever wondered what it would be like to live with less? Why not give it a try? Less stuff means you have less to organize and maintain. Here are 3 ideas for you to sample for the month or for two weeks.
|
|
|||||||||||||||||||||||
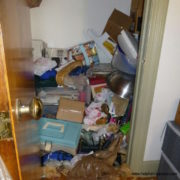
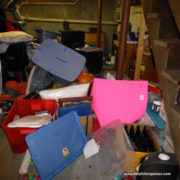
I was very fortunate to have the opportunity to give a presentation on Conquering Clutter with Confidence at the 2018 Conference for NERSC (New England Resident Service Coordinators). I was excited to share my knowledge and expertise with this group. I started my presentation with the question, What is clutter? I shared the dictionary definition and my definition.

After explaining my definition I was ready to move on, but was stopped with a few questions. One was, “What is the difference between hoarding and clutter and when is the line crossed?” I explained about the clutter-hoarding scale which is a tool used specifically for this purpose, and there is an image rating that is helpful to view. I also mentioned that I do not have the skill set to work with level 4 or 5 hoarders because the situation calls for more intervention and support than I can provide.
A second question was, “I have 3 sets of Christmas dishes, and my husband calls them clutter; are they?” To answer this I had to ask a few clarifying questions. Are the dishes scattered about in a jumbled mess? Her answer was no. Are they being used and serving a specific purpose? Her answer was yes. Are they causing you stress or frustration? Her answer was no for me, but yes for my husband. I told her that in my opinion, based on her answers to my questions, her Christmas dishes were not clutter. She gave an excited yelp and said she couldn’t wait to tell her husband. However, I was compelled to add that 3 sets of Christmas dishes may be a bit excessive, and if her answers to any of the 3 questions changes in the future, then their label would in fact be changed to clutter. I also pointed out that each individual views their own personal possessions differently than another person’s possessions. It is easy to misunderstand the value someone places on their own things. So think twice before tossing out someone’s stuff (“clutter”).
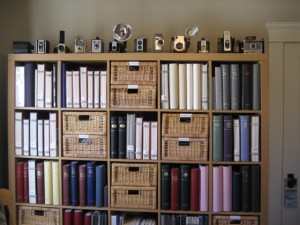 A third question was asked, “What is the difference between a collection and clutter?” The dictionary definition of a collection is a group of objects or works to be seen, studied, or kept together. A collection is a group of items that someone is proud to share and display. Would you be proud to share and display your clutter? A collection holds monetary and sentimental value where as clutter is usually unimportant, random stuff. A collection is intentionally collected, but clutter is a mess that has accumulated as a result of not deciding what to do with things and not taking action with those things.
After thoroughly answering the question, what is clutter we discussed several clutter conquering solutions. Would you like some solutions? They can be found in the following articles.
©May 2018 Janine Cavanaugh, Certified Professional Organizer® All Rights Reserved


Follow Me